Learning how to install WordPress is the first real step toward building your own website. The good news is that it is much easier than most people think. You do not need any coding knowledge, technical experience, or special software. With modern hosting providers, you can install WordPress in less than 5 minutes with just a few clicks.
In this guide, we will show you the easiest way to install WordPress step by step. We will focus on the 1 click installation method because it is the fastest, simplest, and most beginner friendly approach. By the end of this guide, you will have WordPress fully installed and ready to use on your website.
If you do not have hosting and a domain name yet, you will need those first. Read our domain and hosting guide to get both for under $3 per month. If you already have hosting, let us jump straight into the installation.
What Do You Need Before You Install WordPress?
Before you can install WordPress, you need two things:
A domain name. This is the address people type to visit your website (like yoursite.com). If you do not have one yet, check our domain name guide for tips on choosing the perfect one.
A web hosting account. This is where your website files are stored on the internet. We recommend Hostinger or Bluehost because both include a free domain name, free SSL certificate, and 1 click WordPress installation. See our hosting comparison for more options.
Once you have these two things, you are ready to install WordPress. Let us get started.
Start Here
Which host are you using?
Click your host below and jump straight to the exact steps for it. Each section is complete on its own, so you only need to read yours.
How to Install WordPress on Hostinger (Step by Step)
If you have been following another tutorial and cannot find the buttons it tells you to click, you are not doing anything wrong. Hostinger redesigned its control panel, and the old route through a tool called the Auto Installer no longer exists. Most guides still ranking in Google describe that dead route, which is why so many people get stuck at the first step.
This guide shows you how to install WordPress on Hostinger the way it actually works now, using screenshots taken from a real account rather than old marketing images. There is no code, nothing to download, and no database to set up. The whole thing takes about five minutes and by the end you will have a live WordPress site ready for a theme and your first pages.
Quick Answer
To install WordPress on Hostinger, log in and open Websites in the left menu, click Add website, then choose WordPress. Pick your domain, set your admin language, email and a strong password, then choose Build from scratch. Installation takes a few minutes and you log in afterwards at yourdomain.com/wp-admin. If you have only just bought hosting, the same wizard starts automatically from your account home.
Before you start you need:
An active Hostinger hosting plan
Your Hostinger login details
A domain
About five minutes
If you have not bought hosting yet, start there first. My guide on how to sign up for Hostinger covers choosing a plan and claiming your free domain, then come straight back here.
There Are Two Ways In, and Both End Up in the Same Place
This is the part that confuses people, so it is worth two minutes before you start clicking. Which screens you see first depends on when you are doing this.
Route A: you have just bought hosting
Hostinger starts a setup wizard for you. You do not need to go looking for anything. Follow Route A below.
Route B: you already have an account
Maybe you skipped the wizard, or you are adding a second website. You start it yourself from the Websites section. Follow Route B below.
Both routes ask you exactly the same questions and install exactly the same thing. The only difference is the order the questions appear in. Hostinger has also confirmed that the screens vary slightly between accounts and panel versions, so do not worry if yours appear in a different sequence to the one shown here. Answer the same way regardless and you will end up in the same place.
Route A: Installing WordPress Right After You Buy Hosting
When your payment goes through, Hostinger takes you into your account and offers to set everything up. Here is what happens, in order.
Step 1: Start the Setup
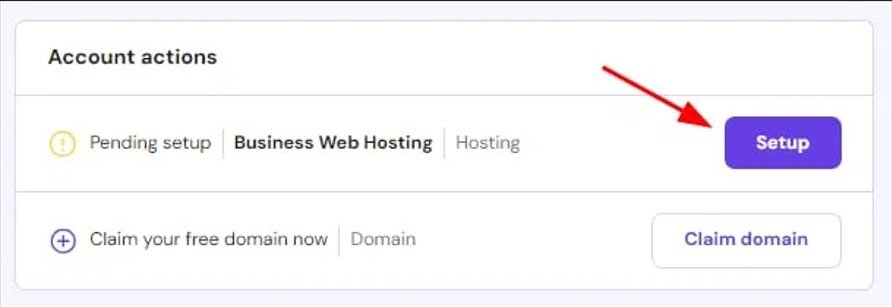
After the payment confirmation you land on your account home page. Look for a section called Account actions, where your new hosting plan appears marked as pending setup, with a Setup button beside it. Click that button to begin. This is the step most tutorials skip entirely, which is why people end up hunting through menus for an installer that is not there.
Step 2: Choose to Create a New Website
The wizard asks whether you want to create a new website or migrate one that already exists elsewhere. Choose to create a new website. Migration is only for people moving an existing site from another host, and it is a different process entirely.
Step 3: Choose WordPress
Now you pick what to build your site with. This is the single most important decision in the whole process, and it is the one where beginners most often go wrong. The next section explains exactly why, so read it before you click.
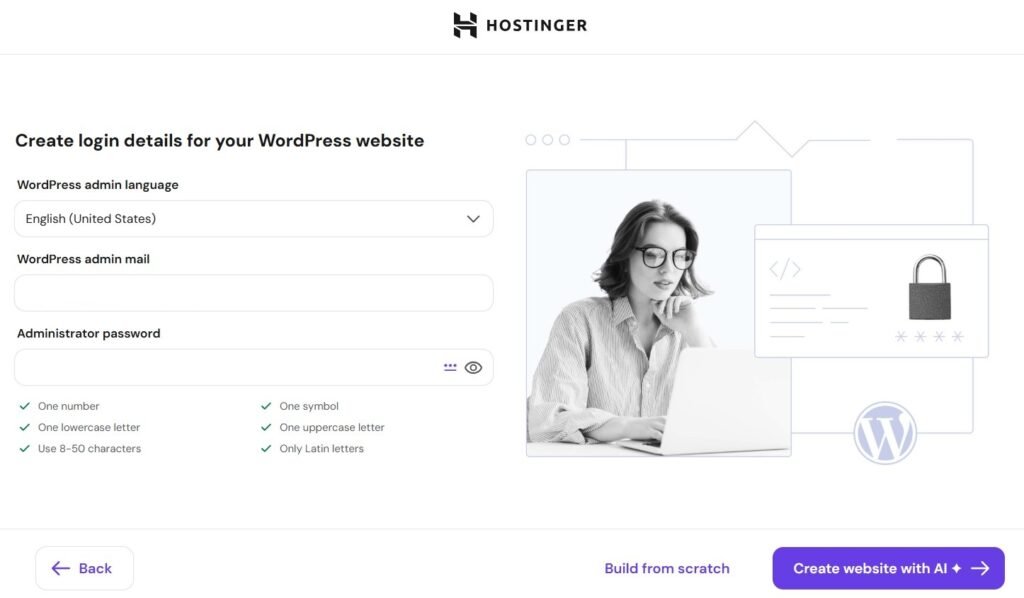
Step 4: Enter Your WordPress Login Details
You set your admin language, the email address you want notices sent to, and a password. This is covered in detail further down, since both routes share this screen.
Step 5: Choose Between AI Setup and a Blank Site
Hostinger offers to generate a site for you using AI, or to give you a blank WordPress installation. There is an honest comparison of these further down. For anyone learning WordPress, the blank option is the right answer.
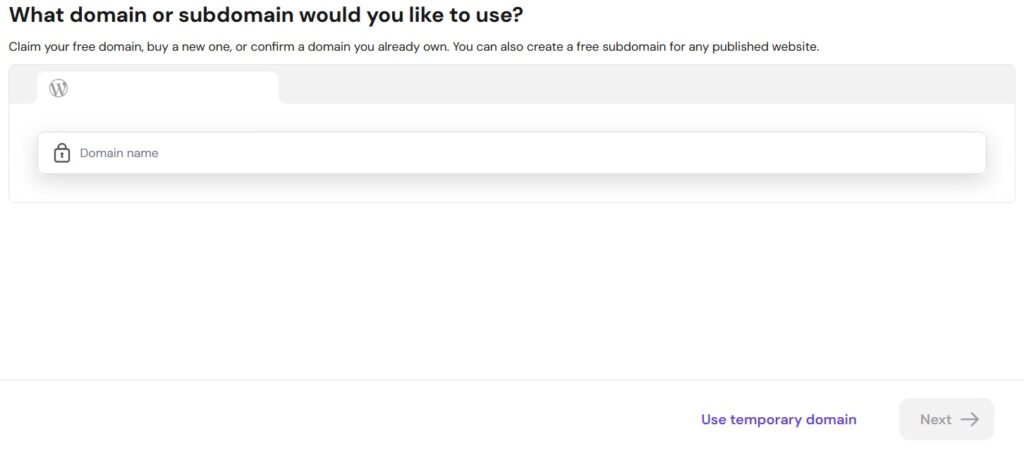
Step 6: Pick Your Domain
Claim your free domain, connect one you already own, create a subdomain, or take the temporary domain option if you have not decided on a name yet.
Step 7: Choose a Server Location
You are asked where your website should physically live. Pick the location closest to where most of your visitors will be, since a shorter distance means a faster website for them. If you are unsure, leave whatever Hostinger suggests. It is a sensible default and you are not locked into it forever.
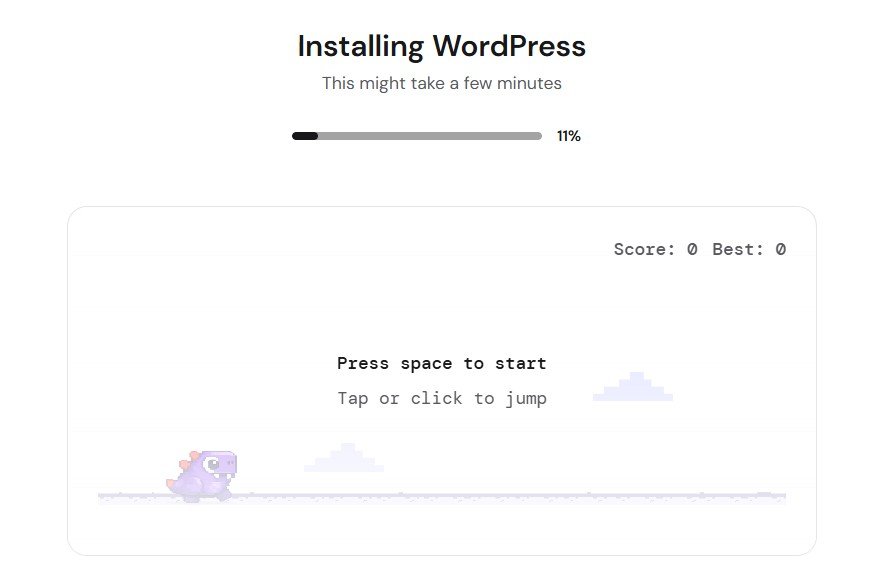
Step 8: Wait for Installation
Hostinger builds your site. A progress screen appears and it usually takes a few minutes. Leave the tab open until it finishes, then jump to the section below on logging in.
Route B: Installing WordPress From an Existing Account
If you skipped the wizard, or you are adding another website to a plan you already own, you start the process yourself. These are the screens from a real account.
Step 1: Open the Websites Section
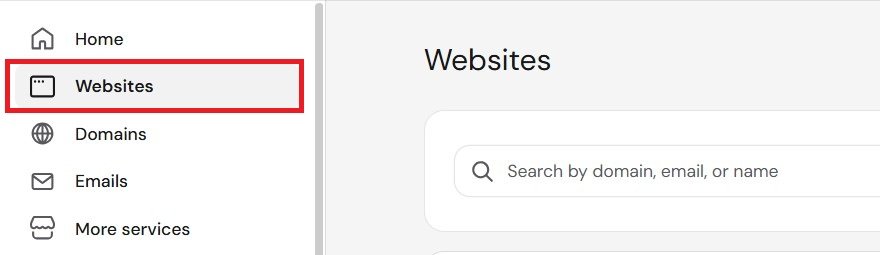
Log in and click Websites in the left hand menu. This is the hub for everything site related, and it lists any websites you already have along with the tools to manage them.
This is where people following older tutorials get stuck. There is no Manage button to click any more, and no hPanel section to scroll through looking for an installer. Websites in the left menu is the starting point now.
Step 2: Click Add Website
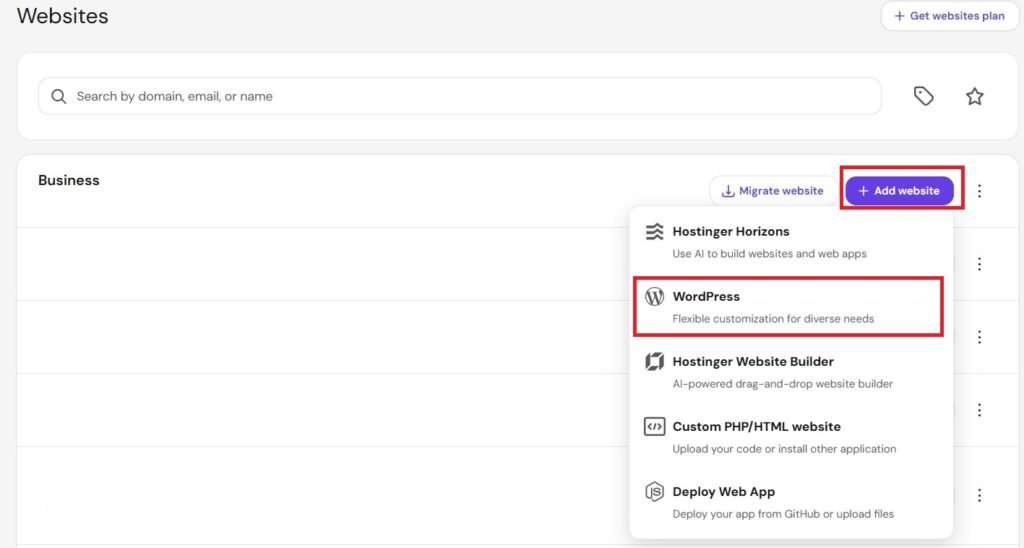
Find the Add website button near the top right and click it. A short menu opens listing the different kinds of site you can create. This menu is where WordPress installation now lives.
Step 3: Choose Your Domain
Hostinger asks which web address your site should use. Type your choice into the field and wait for the green tick that confirms it is valid, then continue.
Your free domain, if your plan includes one and you have claimed it
A domain you already own elsewhere, which Hostinger will help you point over
A subdomain, such as blog.yourdomain.com, to build on part of a site you own
A temporary domain, if you have not chosen a name yet
Not settled on a name yet? Take the temporary domain option and start building today. Waiting for the perfect domain name is the single most common reason a first website never gets made. You can attach your real domain later and keep everything you have built.
The Choice That Trips Up Most Beginners
Both routes reach a screen asking how you want to build your website, and this is where it is genuinely easy to make an expensive mistake. Hostinger labels WordPress as fully customizable, and its own Website Builder as beginner friendly.
Read those two labels as a nervous first timer and the builder sounds like the safer choice. It is not, and here is the honest reason why.
WordPress CHOOSE THIS
Real WordPress. Thousands of free themes and plugins, full control of your site, and it works with every tutorial on this website. You own what you build and you can move it to another host whenever you like.
Hostinger Website Builder
A separate drag and drop product. It is not WordPress, so no WordPress themes, no WordPress plugins, and none of the guides here will match what you see. Your site also stays tied to that builder, so moving elsewhere later means rebuilding from nothing.
The other options on that menu are worth knowing about so you do not pick one by accident. Hostinger Horizons is an AI tool for building web apps. Custom PHP or HTML is for uploading your own code. Deploy Web App is for developers pushing code from a repository. None of these are what you want here.
Choose WordPress. If you pick the Website Builder now and change your mind in three months, nothing transfers. Every page has to be rebuilt from scratch. Making the right choice at this screen saves you that entire wasted effort.
Creating Your WordPress Login Details
Both routes share this screen. You are setting the login you will use every single time you work on your website, so it is worth thirty seconds of care.
WordPress admin language: the language of your dashboard. English is the default and matches most tutorials, including the ones on this site.
WordPress admin email: where password resets and important notices are sent. Use an address you genuinely check.
Administrator password: your key to the whole site. Hostinger shows a live checklist as you type, asking for a number, a symbol, an uppercase letter, a lowercase letter, and between eight and fifty characters.
Why this password matters more than you think. Most WordPress sites that get broken into are not targeted by skilled attackers. They are found by automated bots working through lists of weak passwords on thousands of sites at once. A long password you have not used anywhere else removes you from that pool entirely. Save it in a password manager and you never have to think about it again.
Build From Scratch or Let AI Do It
The last decision before installation is whether Hostinger should generate a starter site for you with AI, or simply give you clean WordPress to build yourself. Both produce a real WordPress site, so this is not a trick question, but they suit different people.
What you get
Build from scratch
Create with AI
Real WordPress
Yes
Yes
Starting point
Clean and empty
Pages already generated
Learning curve
You learn as you build
You unpick someone else’s structure
Matches this site’s guides
Yes
Screens may differ
Best for
Anyone learning WordPress
A quick rough draft
Choose Build from scratch. Starting clean sounds harder and is actually easier, because you understand every part of your site as you add it. An AI generated site looks impressive for about ten minutes, then you spend far longer working out what it did and undoing the parts you do not want.
Wait for WordPress to Install
Hostinger now does the work. A progress screen appears while it creates your database, installs WordPress, and configures your site, all of which older tutorials made you do by hand with file uploads and database setup. There is even a small game on the screen while you wait.
It usually takes a few minutes. Leave the tab open until it finishes. When it completes, your new website appears in your Websites list and it is live on the internet.
Log In to Your New WordPress Site
Your site exists, and now you need to get inside it. There are two ways in and both work.
From your Websites list, click the WP Admin button beside your new site, which logs you straight in
Or visit your web address followed by /wp-admin, for example yourdomain.com/wp-admin, then enter the admin email and password you set earlier
You will land on the WordPress dashboard. This is where everything happens from now on, your pages, your posts, your theme and your plugins. Bookmark it, because you will be back here constantly.
Check That Your Site Is Secure
Hostinger includes a free SSL certificate, which is what makes a website load with https and show a padlock in the address bar. Visitors trust it, and search engines expect it. It is normally applied automatically during setup.
Open your website in a new tab and look at the address bar. A padlock and https means you are done. If you see a not secure warning instead, give it a little longer to finish activating, and if it still has not appeared you can turn on the free SSL from the security settings for that site in your panel.
Your Site Is Live, Now Make It Look Like Yours
WordPress is installed, but it is currently wearing the plain default theme that every new installation starts with. Nobody launches on it. Your next job is choosing a theme, which controls how your entire website looks, and picking a fast one matters because page speed affects both how visitors feel and how well you rank.
Worth knowing: Hostinger used to offer theme selection during setup and has since removed it, so themes are now installed from inside WordPress itself under Appearance and Themes. My next guide walks you through it: how to install a WordPress theme.
Next Step
Give Your Site a Real Design
WordPress is live. Now install a theme and shape your site the way you want it, with no code and no designer. Four methods, ten minutes.
Everything above assumes you already have a Hostinger plan, because WordPress needs somewhere to live before you can install it. If you have not sorted that yet, Hostinger is what I point beginners toward for three specific reasons. A free domain is included on annual plans, the installer does all the technical work you just read about, and there is a thirty day money back guarantee, so a first attempt at a website costs you nothing if you change your mind.
Discount applies through this link. Thirty day money back guarantee.
Problems and Quick Fixes
I Cannot Find the Auto Installer
You will not find it, and there is nothing wrong with your account. Hostinger removed that route when it redesigned the panel. Installing WordPress now happens through Websites in the left menu, then Add website, or through the setup wizard if you have only just bought hosting.
My Screens Appear in a Different Order
That is normal and Hostinger has confirmed it. The exact sequence varies between accounts and panel versions. The questions are always the same, so answer them the same way as this guide and you will reach the same result.
I Chose the Website Builder by Mistake
Fix this immediately, before you spend hours adding content. Delete that site from your Websites list and start again, choosing WordPress this time. The two products are completely separate and nothing you build in one transfers to the other, so the sooner you correct it the less work you lose.
My Site Shows a Not Secure Warning
Your SSL certificate has not finished activating yet. Wait a little and refresh. If the warning persists, open the security settings for that website in your panel and enable the free SSL certificate, then check again shortly afterwards.
I Have Forgotten My WordPress Password
Go to yourdomain.com/wp-admin and click the lost your password link. WordPress emails a reset link to the admin address you set during installation, which is exactly why using an email you actually check matters.
Frequently Asked Questions
How long does it take to install WordPress on Hostinger?
Answering the setup questions takes two or three minutes, and the installation itself usually finishes in a few more. From logging in to reaching your WordPress dashboard, expect around five minutes in total.
Why can I not find the Auto Installer any more?
Because Hostinger redesigned its panel and replaced it. Any tutorial telling you to open hPanel and scroll to an Auto Installer is out of date. WordPress is now installed through Websites and then Add website, or automatically through the setup wizard after you buy hosting.
Should I choose WordPress or the Hostinger Website Builder?
Choose WordPress. The builder is labeled as beginner friendly, which makes it tempting, but it is a separate product that cannot use WordPress themes or plugins, and your site stays locked to it. WordPress gives you thousands of free themes and plugins, full ownership of your site, and the freedom to move hosts later without rebuilding anything.
Does installing WordPress cost anything extra?
No. WordPress is free open source software and the installer is included with your hosting plan. You pay for hosting and nothing more to get WordPress running on it.
Can I install WordPress before choosing a domain name?
Yes. Choose the temporary domain option and start building immediately. You can attach your real domain later without losing anything you have made, which is far better than delaying your website for weeks over a name.
Which server location should I choose?
Pick the one closest to where most of your visitors are, since a shorter distance means faster loading for them. If your audience is spread out or you are not sure, leave whatever Hostinger suggests. It is a reasonable default and not a decision you are permanently stuck with.
Can I install WordPress on more than one domain?
Yes, as long as your plan allows more than one website. Entry plans limit how many sites you can host while higher plans allow many. To add another, run the Add website process again and choose a different domain or subdomain.
What should I do first after installing WordPress?
Install a theme, because that decides how your whole site looks and how fast it loads. After that, add a small set of essential plugins and create your main pages. Follow the theme install guide linked above to take the next step properly.
You Have a Live WordPress Website
That is the whole job. You opened the setup, chose WordPress rather than the builder, set your login details, picked a domain, and let Hostinger handle everything technical. No code, no file transfers, no database work, and no hunting through menus that no longer exist.
The next step is the one that makes it feel like yours. Follow my guide on how to install a WordPress theme to give your site a proper design, and then you are ready to add your content and share it with the world.
How to Install WordPress on Bluehost (Step by Step)
Bluehost is officially recommended by WordPress.org and makes the installation process equally simple. In fact, Bluehost installs WordPress automatically when you sign up. Here is what the process looks like:
1
Sign up for a Bluehost hosting plan Go to Bluehost (click here to visit), choose a plan, register your free domain name, and complete the signup.
2
WordPress installs automatically After completing your purchase, Bluehost automatically installs WordPress on your domain. You do not need to do anything extra.
3
Log in to your Bluehost dashboard You will see a button that says “Log in to WordPress.” Click it to access your WordPress dashboard directly.
4
Start building your website You are now inside your WordPress dashboard. From here you can choose a theme, install plugins, create pages, and start adding content.
That is literally it. Bluehost handles everything for you. WordPress is ready to use the moment you finish signing up.
How to Log In to Your WordPress Dashboard
After you install WordPress, you need to know how to access your dashboard. This is the control panel where you manage your entire website.
Your login URL is: yourdomain.com/wp-admin
Replace “yourdomain.com” with your actual domain name. For example, if your domain is myblog.com, you would go to myblog.com/wp-admin in your browser. Enter the username (or email) and password you created during installation, and you will see the WordPress dashboard.
Save your login URL: Bookmark yourdomain.com/wp-admin in your browser so you can quickly access your WordPress dashboard anytime. If you forget your password, click “Lost your password?” on the login page and WordPress will send a reset link to your email.
What to Do Immediately After You Install WordPress
Once you have WordPress installed, there are a few important things to do right away before you start creating content. These settings will make your website faster, more secure, and better for SEO.
1. Set Your Permalink Structure
Go to Settings > Permalinks in your WordPress dashboard. Select “Post name” and click Save Changes. This makes your URLs clean and SEO friendly. Instead of yourdomain.com/?p=123, your URLs will look like yourdomain.com/your-post-title. Do this immediately because changing it later can break your existing links.
2. Set Your Site Title and Tagline
Go to Settings > General. Enter your website name as the Site Title and a short description as the Tagline. This information appears in search results and browser tabs.
3. Install a WordPress Theme
Go to Appearance > Themes > Add New Theme. Search for a theme you like, click Install, then Activate. We recommend GeneratePress for speed, Astra for versatility, or Divi for visual drag and drop design. Read our Divi theme review for a detailed look.
4. Install Essential Plugins
Go to Plugins > Add New and install these essential free plugins:
LiteSpeed Cache for speed optimization (if your host uses LiteSpeed servers like Hostinger)
UpdraftPlus for automatic backups
5. Delete Default Content
WordPress comes with a sample post called “Hello World,” a sample page called “Sample Page,” and a sample comment. Delete all of these. Go to Posts > All Posts and delete the sample post. Go to Pages > All Pages and delete the sample page. Go to Comments and delete the sample comment. You want a clean slate before you start creating your own content.
6. Set Up SSL (HTTPS)
If you are using Hostinger or Bluehost, your SSL certificate is already included for free. Make sure your website URL starts with https:// instead of http://. Go to Settings > General and check that both the WordPress Address and Site Address begin with https://. This encrypts your website and is required by Google for better search rankings.
7. Create Your Essential Pages
Every website needs certain core pages from day one. Create these by going to Pages > Add New:
Homepage (what visitors see first)
About page (who you are and what your site is about)
Contact page (use WPForms to add a contact form)
Privacy Policy (go to Settings > Privacy to generate a basic one)
For a complete walkthrough of setting up your entire website after installation, including themes, plugins, menus, and content creation, follow our complete guide to creating a WordPress website.
Common WordPress Installation Problems (and How to Fix Them)
Most people install WordPress without any issues. But if you run into a problem, here are the most common ones and their solutions:
“Error establishing a database connection” means WordPress cannot connect to the database where your website data is stored. This usually happens if your database credentials are incorrect. Contact your hosting provider’s support team and they will fix it for you in minutes.
White screen after installation usually means a plugin or theme conflict. Try accessing yourdomain.com/wp-admin. If you can log in, deactivate all plugins and switch to a default theme. If you cannot access the dashboard, contact your hosting support.
WordPress login page not loading can happen if your domain DNS has not fully propagated yet. This can take up to 24 to 48 hours after registering a new domain. Wait a few hours and try again.
Forgot your password is the easiest fix. Go to yourdomain.com/wp-admin, click “Lost your password?”, enter your email, and WordPress will send you a password reset link.
Pro tip: If you ever get stuck during installation, both Hostinger and Bluehost offer 24/7 customer support via live chat. They deal with WordPress installations every day and can resolve most issues in minutes.
Frequently Asked Questions
Is WordPress free to install?
Yes, the WordPress software is 100% free. You can download it from WordPress.org at no cost. However, you do need a web hosting account (starting under $3 per month) and a domain name (free with most hosting plans) to install WordPress and make your website accessible on the internet.
How long does it take to install WordPress?
With modern hosting providers like Hostinger and Bluehost, you can install WordPress in less than 5 minutes using their 1 click installation feature. Bluehost even installs WordPress automatically when you sign up. The entire process from purchasing hosting to having a working WordPress site takes under 10 minutes.
Do I need coding skills to install WordPress?
No coding skills are needed. The 1 click installation method handles everything automatically. You just click a few buttons, enter your login details, and WordPress is ready to use. This is why we recommend hosting providers that offer 1 click installers instead of manual installation.
Can I install WordPress without hosting?
You cannot run a live WordPress website without hosting. Hosting is what makes your website accessible on the internet. However, you can install WordPress on your own computer for testing purposes using free tools like Local. But to make your site public so others can visit it, you need a hosting plan.
What is the easiest way to install WordPress?
The easiest way is to use a hosting provider that offers 1 click WordPress installation. Hostinger and Bluehost both offer this feature. You simply sign up for hosting, and WordPress is installed for you automatically within minutes. No downloading files, no database setup, no technical steps required.
What should I do after installing WordPress?
After installation, set your permalink structure to “Post name”, install a theme, add essential plugins (Rank Math SEO, WPForms, cache plugin, backup plugin), delete the default sample content, set up SSL, and create your essential pages (Home, About, Contact, Privacy Policy). Then start publishing content. Follow our complete website building guide for detailed steps.
Can I install WordPress on Hostinger?
Yes. Hostinger has one of the easiest WordPress installation processes. Their setup wizard walks you through every step. You choose WordPress as your platform, enter your login details, select your domain, and WordPress is installed in about 1 to 2 minutes. No technical knowledge required.
Can I install WordPress on Bluehost?
Yes. In fact, Bluehost installs WordPress automatically when you sign up for a hosting plan. You do not need to do anything extra. Just log in to your Bluehost dashboard and click “Log in to WordPress” to access your site. Bluehost is officially recommended by WordPress.org.
Start Building Your WordPress Website
You now know exactly how to install WordPress. The process takes less than 5 minutes and requires zero technical knowledge. Whether you choose Hostinger or Bluehost, both make the installation effortless for beginners.
After installation, your next step is to set up your website properly. Follow our complete guide to creating a WordPress website for a detailed walkthrough of themes, plugins, pages, menus, and everything else you need.
If you are completely new to WordPress and want to understand what it is first, read our guide to what is WordPress.
Need Hosting to Install WordPress?
WordPress installs in 1 click with these beginner friendly hosts. Free domain and SSL included.
Riz builds and tests WordPress sites and writes tutorials for complete beginners. He runs wpolc.com so people can get their first website online without the confusion, the jargon, or the wasted money.